Go to Chapter 1 : Chapter 2.1 Contents
The application that that interact with you for monitoring and control is the GW_Monitor.exe. This app installs by default in :
C:\Program Files\GW_Monitor\GW_Moniotr.exe
It is guaranteed to work properly under Windows XP, Windows 2000 and Win NT 4.0 (SP 6). It requires at least 10 MB hard drive and uses 4 MB while running. It has not been tested under other operating systems but it doesn't mean that it won't work, just that is not guaranteed to do so 100%. The default configuration file is GW_Mon.ini, but you may specify a different file name and/or path on the command line. You will need to do so if need to monitor more than one gateway from the same computer, since on of the configuration parameters is the GW_Relay IP address (RELAY_IP) and TCP Port (RELAY_TCP_PORT). The best way to go is to create one short cut to GW_Monitor.exe on the Desktop (or the Start Menu), create one "ini" file for each GW_Relay in the GW_Monitor subdirectory with the right IP and Port for each, then open the properties window and in the "Shortcut" tag, in the "Taget" text-box, add the name of the ini file corresponding to each GW_Relay. Example:
"D:\Program Files\GW_Monitor\GW_Monitor.exe" GW_Mon25.ini
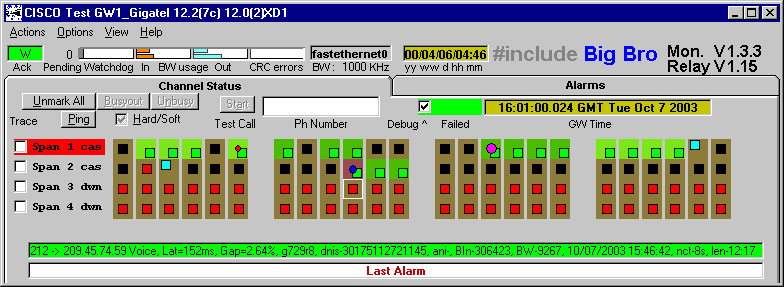
The GW_Monitor looks like this:

The monitor, in normal operation, receives a average 4Kbits/s, it works well with a dialup connections. The Help button will take you to this Web Site. The caption of the Window will show the title string specified in the "ini" file (TITLE) concatenated to the gateway prompt and to the its software and Boot versions. To the right of the brand name the versions of the GW_Monitor is show on top of the GW_Relay..
The Channel Status tag shows all the channels in one row per span, 24 channels for T1 gateways and 31 for E1. The span type CAS or PRI (or DWN when not used) is shown in a label to the left of the rows. The span with the master clock shows the label in red.
Go to Chapter 1 : Chapter 2.1 Contents